Thanks mate. Wiped with alcohol, stuck the new valve on and then glued around the edge. Left for 24 hr and now waiting for an opportunity to pump the kite. It’s a little thing but I’m chuffed to bits with a little bit of diy.
Tips and Tricks to Repair Kites - add your experience!
-
apollo4000
- Frequent Poster
- Posts: 434
- Joined: Thu Jan 03, 2013 2:27 pm
- Kiting since: 2006
- Local Beach: Camber / Lancing / Whitstable
- Favorite Beaches: The next one
- Style: trying hard
- Gear: All sorts
- Brand Affiliation: Nope. Just a regular Joe.
- Has thanked: 157 times
- Been thanked: 48 times
Re: Tips and Tricks to Repair Kites - add your experience!
All good to go! Great repair kit from DrTuba.
- Attachments
-
-
-
JaZone
- Medium Poster
- Posts: 166
- Joined: Sat May 18, 2013 2:14 am
- Brand Affiliation: None
- Has thanked: 3 times
- Been thanked: 6 times
Re: Tips and Tricks to Repair Kites - add your experience!
had to repair a major leading edge blowout , cause when the kite torpedoe'd , and hit the reef.
didn't turn out too bad, and kite flies just as the way it did before the repair.
-
MutantWizard
- Rare Poster
- Posts: 5
- Joined: Sun May 13, 2018 5:52 am
- Local Beach: Tablas
- Style: Freeride, Big Air
- Gear: North / CrazyFly
- Brand Affiliation: None
- Has thanked: 0
- Been thanked: 0
- Contact:
Re: Tips and Tricks to Repair Kites - add your experience!
Greets, my first post and thanks for the lot of tips found here.
Here is one of mine. Check the pic. This kite has seen a couple years of action when I bought it as my first and learned to ride on it. Attached it as high resolution so If you close up U will see along dacron on the trailing edge all the repairs. Fabric started falling apart from just touching it. That's when I treated the sail and its now as good if not better than when it was new. Here is how.
Pump up and open the kite. Get a small can of water based clear acrylic varnish or sometimes called acrylic emulsion. Usually this is intended for waterproofing exterior concrete walls. Mix half and half with water and apply one coat on each side of the sail. A brush or a roller is ok, just try not to be to liberal to prevent beads but still apply sufficient for it to soak into the sail fabric. It dries quickly and withing 15-20 minutes the sail is like a new plastic sheet. Try not to get any on the leading edge to prevent soak through and sticking the bladder to it. Welcome to your brand new kite!
- Attachments
-
-
JaZone
- Medium Poster
- Posts: 166
- Joined: Sat May 18, 2013 2:14 am
- Brand Affiliation: None
- Has thanked: 3 times
- Been thanked: 6 times
Re: Tips and Tricks to Repair Kites - add your experience!
Did you coat the entire canopy ?
Does it add a lot of weight to the kite ?
You should do some strength tests , to see if it actually is as strong as original.
Does it add a lot of weight to the kite ?
You should do some strength tests , to see if it actually is as strong as original.
-
MutantWizard
- Rare Poster
- Posts: 5
- Joined: Sun May 13, 2018 5:52 am
- Local Beach: Tablas
- Style: Freeride, Big Air
- Gear: North / CrazyFly
- Brand Affiliation: None
- Has thanked: 0
- Been thanked: 0
- Contact:
Re: Tips and Tricks to Repair Kites - add your experience!
Yes coat entire canopy if you want. Not really necessary on the dacron reinforced areas but its easy to do and makes it wind and water proof so why not.
It ads maybe about 100-200 grams which might be noticeable to a pro rider on a light wind kite but riding I cant tell the difference on any 12m or smaller kite.
You are welcome to do strength tests if you feel necessary. For me stretching it by hand was enough to know its more than good enough to ride. It becomes a reinforced plastic sheet. Windproof, waterproof and as close to original as you can get with a kite that was starting to fall apart almost by itself and was ready to be thrown into rubbish.
Keep in mind it works best after the original impregnation is gone as then the varnish soaks in completely into the canopy and no chance for peeling. That's why U should mix half / half with water. To help it soak in.
-
GregK

- Very Frequent Poster
- Posts: 690
- Joined: Sat Jul 24, 2010 6:22 am
- Kiting since: 2000
- Local Beach: Comox, BC
CANADA - Style: Average
- Gear: Lift V2 Surf & HA wingsets
Ocean Rodeo kites & wings - Brand Affiliation: started Comox Kite Repair
- Location: Comox, BC CANADA
- Has thanked: 56 times
- Been thanked: 136 times
Re: Tips and Tricks to Repair Kites - add your experience!
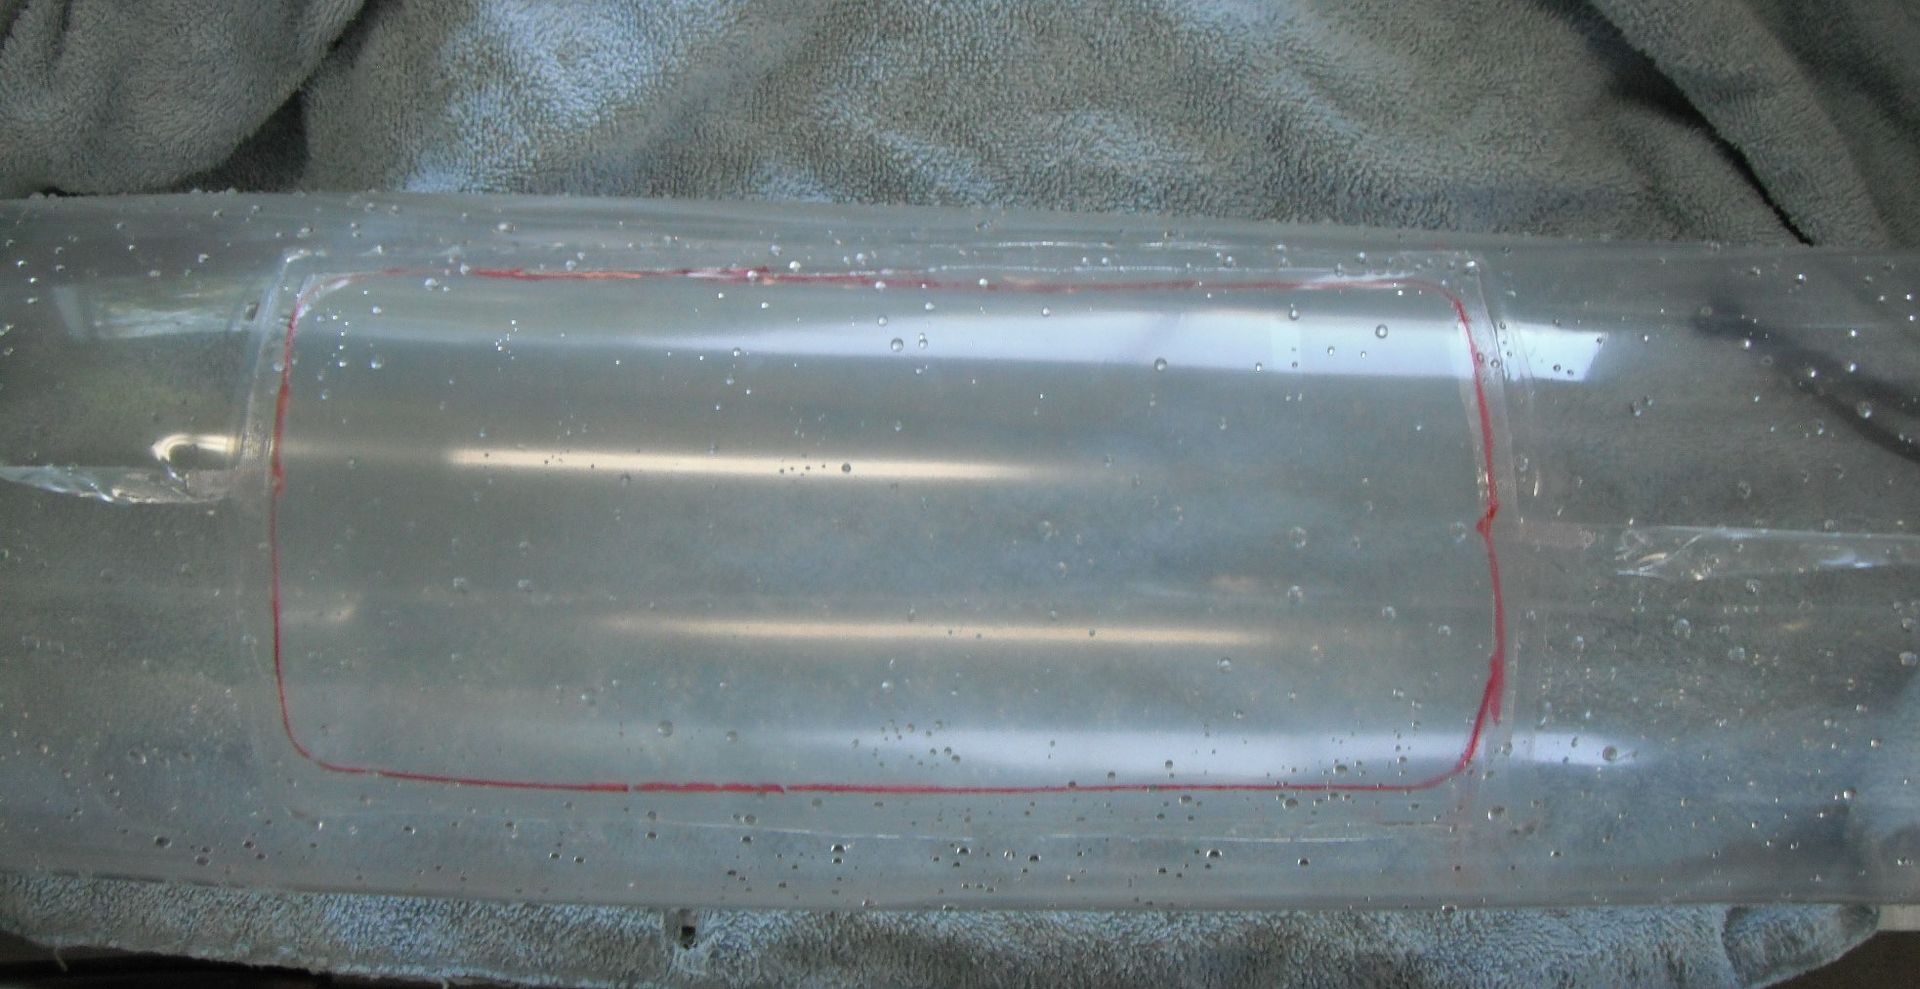
Some pictures of a recent welded LE bladder patch. The blow-out was at the edge seam, so a TearAid patch, which usually end up leaking along the edge seam, wasn't a good repair option. Pictures are taken right after a soapy water leak check of the patch.

-
GregK
- Very Frequent Poster
- Posts: 690
- Joined: Sat Jul 24, 2010 6:22 am
- Kiting since: 2000
- Local Beach: Comox, BC
CANADA - Style: Average
- Gear: Lift V2 Surf & HA wingsets
Ocean Rodeo kites & wings - Brand Affiliation: started Comox Kite Repair
- Location: Comox, BC CANADA
- Has thanked: 56 times
- Been thanked: 136 times
Re: Tips and Tricks to Repair Kites - add your experience!
Damaged bladder film inside the red marker rectangle is cut away and a piece of new bladder film slightly larger than the cut-out is thermally welded over top. The weld is 1/4-inch wide all around the perimeter of the cut-out, just outboard of the red line. 20% of the combined lap joint thickness is extruded out of the sides of the weld width.
Welding is done with micro-processor control of the welding process, similar to the equipment used to thermally weld or heat stake plastic injection-molded parts. However, with most bladders now down to 75 - 80 microns ( 0.003 inch ) thickness, the need for precise control of the welding process exceeds that typically required for most simple plastic part assemblies.
It's not a simple DIY job using home equipment or a plastic bag sealer, it's a professional repair, guaranteed problem-free for the life of the kite, transferable to a new owner if the kite is sold. About as good as it gets IMO.
-
sarc
- Very Frequent Poster
- Posts: 1630
- Joined: Sun Jun 11, 2006 4:01 am
- Has thanked: 37 times
- Been thanked: 135 times
Re: Tips and Tricks to Repair Kites - add your experience!
I'm very interested in this fix as my kite still flies well but canopy is very weak. However years ago I tried a similar fix using spray-on engine lacquer (was recommended in a different forum) and there was no measurable benefit. But this was a different material than GregK is using! So I'd be very interested to hear more from Greg or anyone else with experience with this acrylic varnish (and Greg keep us updated on results if you can!) Cheers!
MutantWizard wrote: ↑Sun May 13, 2018 7:16 pmGreets, my first post and thanks for the lot of tips found here.
Here is one of mine. Check the pic. This kite has seen a couple years of action when I bought it as my first and learned to ride on it. Attached it as high resolution so If you close up U will see along dacron on the trailing edge all the repairs. Fabric started falling apart from just touching it. That's when I treated the sail and its now as good if not better than when it was new. Here is how.
Pump up and open the kite. Get a small can of water based clear acrylic varnish or sometimes called acrylic emulsion. Usually this is intended for waterproofing exterior concrete walls. Mix half and half with water and apply one coat on each side of the sail. A brush or a roller is ok, just try not to be to liberal to prevent beads but still apply sufficient for it to soak into the sail fabric. It dries quickly and withing 15-20 minutes the sail is like a new plastic sheet. Try not to get any on the leading edge to prevent soak through and sticking the bladder to it. Welcome to your brand new kite!
Who is online
Users browsing this forum: No registered users and 371 guests