I would like to know if someone knows how to remove the end cap (close to the leash connection) of the red safety line? Looks like there’s a kind of thearding, the cap is twisting on the black sleeve, but not « unscrewing »... Is there a way to remove it and keeping it undamage or you have to screw this piece and get a new one?
I want to replace all the lines including the safety line.
Will beeing on this subject, would there be a way to replace the red stopper ball by something else? I was thinking about a ss ring like the one already lower on the grey line... It would be easier than installing the ball on a new line.
Another question... I’m using the Clickbar without the Y spliter, so my safety line runs directly through the black plastic piece... So it rub on the edge of the black plastic piece due to the angle... I heard that some people use the splitter at the bottom of the line really close to the black plastic piece to runs the safety line more paralle so it doesn’t rub... Do you think i could just simply runs my safety line through the stainless steel ring already there on the grey line...? Looks simple and the safety line would rub anymore... Anyone tried it? Any reason it couldn’t work?
Thanks a lot!
Clickbar red safety line end cap removal
-
GuillaumeCoteMenard
- Rare Poster
- Posts: 22
- Joined: Fri Feb 15, 2019 7:04 pm
- Style: Wave
- Gear: Neo-Slash
- Brand Affiliation: None
- Has thanked: 0
- Been thanked: 0
Clickbar red safety line end cap removal
- Attachments
-
- 9CB497CF-9E1B-4D6E-AF64-5A60F50C429B.jpeg (26.27 KiB) Viewed 2128 times
-
- 3620F4D5-0710-4DD4-AE63-4A8D95D00D77.jpeg (28.68 KiB) Viewed 2128 times
-
purdyd

- Very Frequent Poster
- Posts: 2326
- Joined: Mon Jan 06, 2003 1:00 am
- Has thanked: 286 times
- Been thanked: 351 times
Re: Clickbar red safety line end cap removal
You. Remove the stainless stopper and just pull off the plastic piece.
Note the plastic part is two pieces. Duotone. Has removed the the tight fitting sleeve in later click bars
.I think running through the stainless fifth. Line ring would be fine.
Note the plastic part is two pieces. Duotone. Has removed the the tight fitting sleeve in later click bars
.I think running through the stainless fifth. Line ring would be fine.
-
Foil
- Very Frequent Poster
- Posts: 1447
- Joined: Mon Oct 23, 2017 7:44 pm
- Kiting since: 2000
- Weight: 91kg
- Local Beach: New Brighton near Liverpool. Open sea with big low tide deep lagoon
and regular at Rhosneigr and Newbrough on Anglesey - Favorite Beaches: New Brighton, Rhosneigr, Fleetwood, Newbrough, Blackrock sands
lake Como (Italy) El Medano - Style: kite foiler since 2017 Ttip since 2000
- Gear: My rule to gear choice is "IF IT DONT BOOST ITS NO USE"
Groove Skates 110cm 2022 editions
kraken mast systems 103k and 93k.
Kraken fuse 703k
Duotone SLS Evo's -- 11mtr/9mtr/7mtr/6mtr/ 4mtr RRD.
Duotone 2022 click bars x2,my own custom made lines fitted,
(modified lines now available for the flite99 shod duotone bars)
Bar lines made up to any length in a choice of strengths, power lines, trim lines, pigtails, leader lines, bridal lines, elasticated lines, I make and fit them all, free fit and tune service,
quick turnaround,drop me a message, find me on messenger, Colin Moore. - Brand Affiliation: None
- Has thanked: 116 times
- Been thanked: 324 times
Re: Clickbar red safety line end cap removal
done this a lot,
and by the way your red line is worn just at the place I have seen two snap, as you know this line is fully loaded, and all click bars i have taken to bits have this hidden wear waiting to bite back if it's not seen to, I now use a sacrificial section of line running up through from the bottom end and out the top of the depower pu tube, and done away with the the red line completely.
Anyways,
To remove the little black plastic cup covering,
just soak the bottom section in hot water, get a small thin screwdriver with a straight edge ready in your hand,
after the plastic cup end has been warmed up in the hot water quickly lift out and turn upside down to see the little stainless ring wedged tight inside and stick the screwdriver end into the ring and pry it clear of the plastic cup end,
as soon as its a bit clear of the cup push the screwdriver through the ring and grasp the screwdriver so its clamped tight in your fist then grip the plastic cup with your other fingers and slide the cup up the line away from the ring which holds the red safety line,
slide it up a good few inches giving you room to push the wet soft red line back through the middle bar of the little metal ring,
loop the end back over the ring and slide the ring off the line, then you can slide off the plastic cup section, then finally the larger second safety leash ring, noting which way round it fits,
many get this wrong and fit it back upside down which jams up the free rotation of the untwisting feature, noT good at all.
Refitting the little plastic end is easy if it's not too damaged, and yours looks just fine,
you will need to again wet out the line and use a very thin feeder line, or the supplied green one that comes with the click bar, but be warned this green thin plastic line puller can break very easily, so I use an old thin section of steering line for the job, you can of course just cut off the thin plastic sleeve joined to the end cup and you are left with just the cup, which works just as well without the thin tube, and is now supplied like that as a spare part anyways, so all good.
as for the tiny red stopper ball it just pulls off the line, dam tight fit! but again wet the line and find a small socket to slide over the top of the line and then bash it off with good force from the top down to the bottom, once off the hidden line joint hidden by the ball it will slide easily off the line, I use ozone SK99 lines to replace the click bar lines, and they come with exactly the same ball fixed in just the right place, easy!
Last edited by Foil on Tue Aug 18, 2020 9:06 am, edited 1 time in total.
-
GuillaumeCoteMenard
- Rare Poster
- Posts: 22
- Joined: Fri Feb 15, 2019 7:04 pm
- Style: Wave
- Gear: Neo-Slash
- Brand Affiliation: None
- Has thanked: 0
- Been thanked: 0
Re: Clickbar red safety line end cap removal
Thanks for the reply!
Could you elaborate a bit more on how works your sacrficial line? Your safety line is still fully loaded?
-
Foil
- Very Frequent Poster
- Posts: 1447
- Joined: Mon Oct 23, 2017 7:44 pm
- Kiting since: 2000
- Weight: 91kg
- Local Beach: New Brighton near Liverpool. Open sea with big low tide deep lagoon
and regular at Rhosneigr and Newbrough on Anglesey - Favorite Beaches: New Brighton, Rhosneigr, Fleetwood, Newbrough, Blackrock sands
lake Como (Italy) El Medano - Style: kite foiler since 2017 Ttip since 2000
- Gear: My rule to gear choice is "IF IT DONT BOOST ITS NO USE"
Groove Skates 110cm 2022 editions
kraken mast systems 103k and 93k.
Kraken fuse 703k
Duotone SLS Evo's -- 11mtr/9mtr/7mtr/6mtr/ 4mtr RRD.
Duotone 2022 click bars x2,my own custom made lines fitted,
(modified lines now available for the flite99 shod duotone bars)
Bar lines made up to any length in a choice of strengths, power lines, trim lines, pigtails, leader lines, bridal lines, elasticated lines, I make and fit them all, free fit and tune service,
quick turnaround,drop me a message, find me on messenger, Colin Moore. - Brand Affiliation: None
- Has thanked: 116 times
- Been thanked: 324 times
Re: Clickbar red safety line end cap removal
its an easy conversion to get this feature, and it brings with it great advantages for future line maintenance,
and its way cheaper and easier, and you end up with better lines, Sk99, much less bulk on the bar, less wind drag due to much thinner lines, same strength lines but with longer life, smoother, more slippy and less likely to tangle as you run them out, no fraying around the ends of the line attachment points (where the common breaks happen)all this at half the price?? yes!!
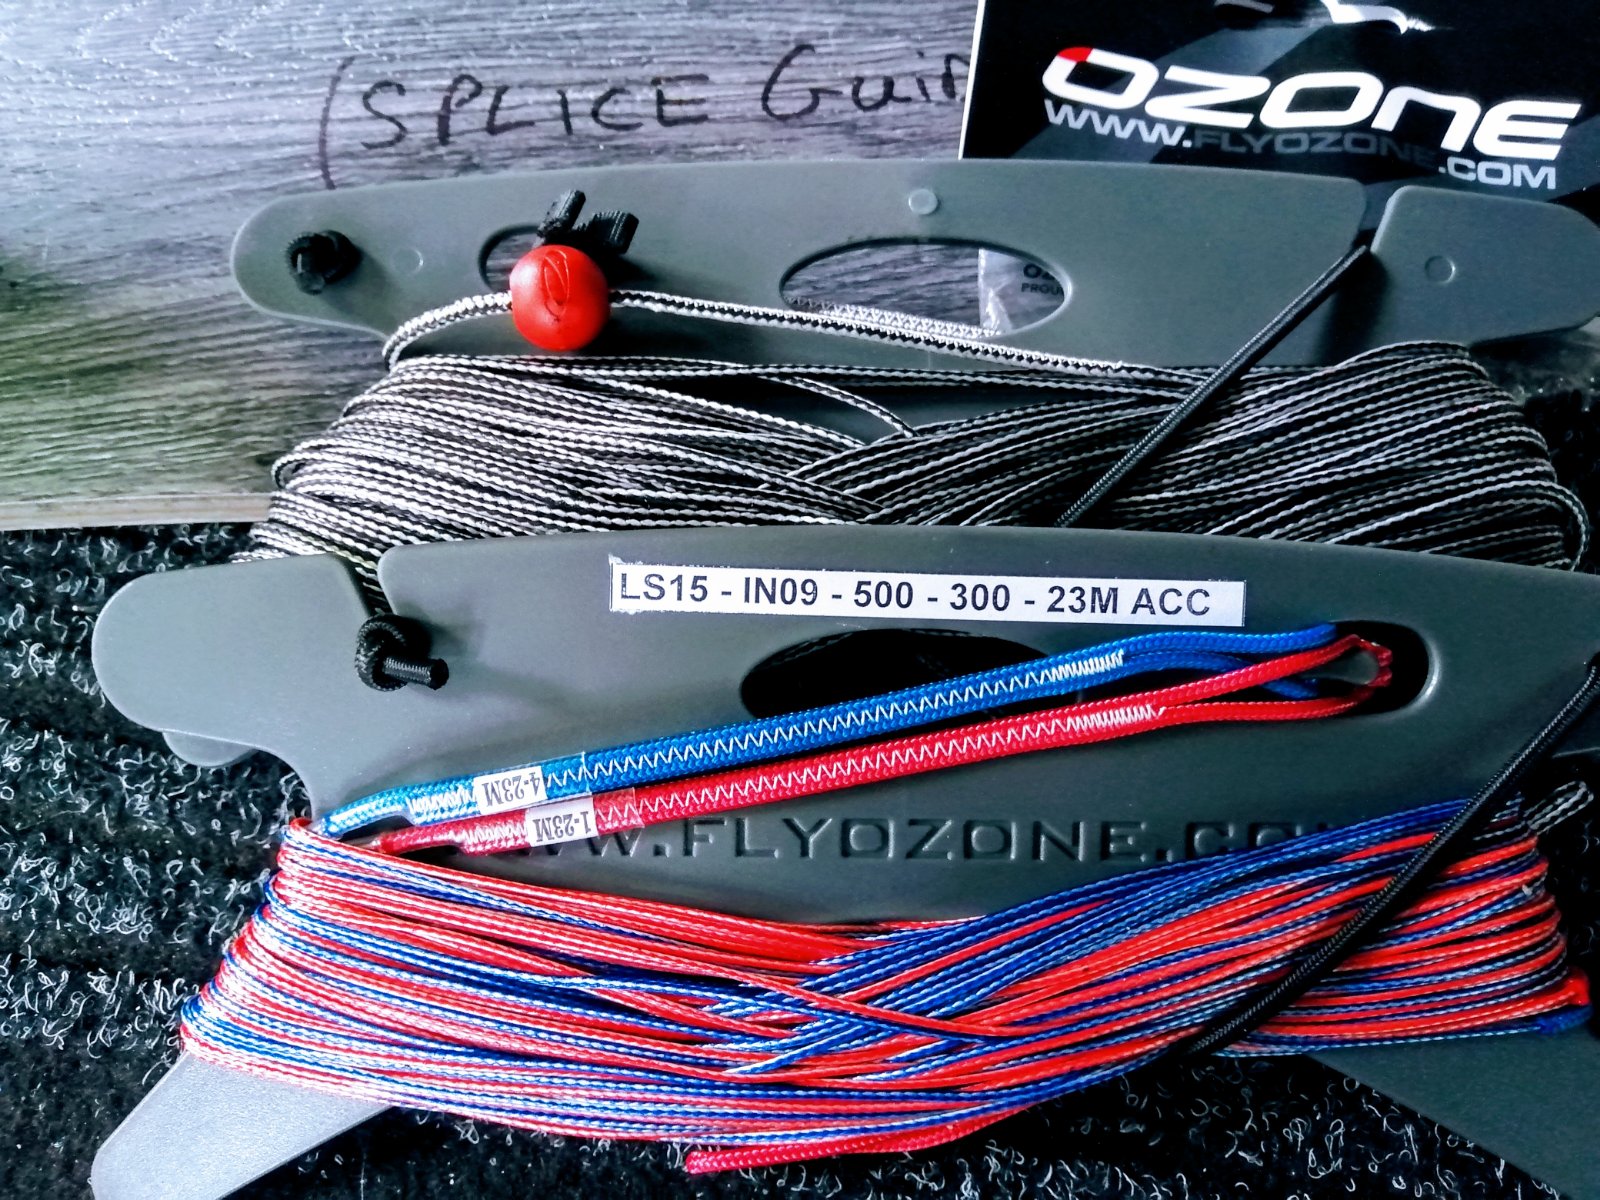
basically you need to buy a full set of standard Ozone lines, choose the length you want, I go for the 23mtr, £125 gmb without discount for the set,
all lines are equal, the flag out line with red trace has the same red bar stop ball in the same place as the click bar, good stuff!
line ends are spot on for a quick swap over, no work to do on the 4 ozone lines.
"ALL" you have to do is make your own (or buy from a custom shop) a length of SK99 500kg line exactly 86cm long, and if you are splicing some spare SK99 lines to make up spares of this sacrificial line with a 15cm bury then remember to add in 20mm at each splice point for the lost length due to the splice bury,
There is good reason to buy the ozone lines in the maximum length available, if your good at splicing, as you can cut them down and use the extra line cuts for the sacrificial lines.
one great by product is you can make or buy many of these 500kg SK99 lengths and use them to renew the line area that gets worn where the lines cross when bar spinning/and kite looping.I am making plenty of these ready for my 6 month beach holiday.
please note!
if you decide to do the conversion then be aware of two points.
1
if you have to use a high Y split (most kites will fly great on no Y split above the depower, try it as some fly better) but if you do need a split point then just use a short length of electrical shrink wrap, 1.5mm internal diameter, use the click bar plastic green feed line to pull the main line through this heat shrink tube, it should be a snug fit, but once in place you can slide it to any chosen place along the line, just mark the point of choice with a black marker, then clamp on top of the sleeve the normal line splitter gismo, fully adjustable trick mod, but don't use heat to shrink the sleeve, you may damage the line, and its not required either if you use the right diameter heat shrink sleeve.
2
the top end of the black plastic power tube line has a small internal moulding lip hidden just inside the tapered top hole where the safety line runs through, this lip MUST be removed, ideally with a micro rat tail file, work the file in with gusto, and then wrap a bit of 800 grit paper around the file end to gloss off the inner hole surface, and then test the free running of the line through the tube, your new line joint must be pulled good and tight before hand, I use an anchor point to exert a hard constant pull and wet the joint in the line to get it thin and smooth, even working it a little with my teeth to get it to settle down nice and smooth with minimal bump in the line, this attention to detail around this joint point is critical, sloppy splicing or slap dash attention to detail is a sure way to get a big bump in the line join, and this will not work safely, so check and get it right before use on the water,
not a modification to try if your rubbish at splicing or not understanding exactly what I am trying to explain.
but get it right and you have the best click bar system ever made, with the best lines, and cheap to maintain!
and its way cheaper and easier, and you end up with better lines, Sk99, much less bulk on the bar, less wind drag due to much thinner lines, same strength lines but with longer life, smoother, more slippy and less likely to tangle as you run them out, no fraying around the ends of the line attachment points (where the common breaks happen)all this at half the price?? yes!!
basically you need to buy a full set of standard Ozone lines, choose the length you want, I go for the 23mtr, £125 gmb without discount for the set,
all lines are equal, the flag out line with red trace has the same red bar stop ball in the same place as the click bar, good stuff!
line ends are spot on for a quick swap over, no work to do on the 4 ozone lines.
"ALL" you have to do is make your own (or buy from a custom shop) a length of SK99 500kg line exactly 86cm long, and if you are splicing some spare SK99 lines to make up spares of this sacrificial line with a 15cm bury then remember to add in 20mm at each splice point for the lost length due to the splice bury,
There is good reason to buy the ozone lines in the maximum length available, if your good at splicing, as you can cut them down and use the extra line cuts for the sacrificial lines.
one great by product is you can make or buy many of these 500kg SK99 lengths and use them to renew the line area that gets worn where the lines cross when bar spinning/and kite looping.I am making plenty of these ready for my 6 month beach holiday.
please note!
if you decide to do the conversion then be aware of two points.
1
if you have to use a high Y split (most kites will fly great on no Y split above the depower, try it as some fly better) but if you do need a split point then just use a short length of electrical shrink wrap, 1.5mm internal diameter, use the click bar plastic green feed line to pull the main line through this heat shrink tube, it should be a snug fit, but once in place you can slide it to any chosen place along the line, just mark the point of choice with a black marker, then clamp on top of the sleeve the normal line splitter gismo, fully adjustable trick mod, but don't use heat to shrink the sleeve, you may damage the line, and its not required either if you use the right diameter heat shrink sleeve.
2
the top end of the black plastic power tube line has a small internal moulding lip hidden just inside the tapered top hole where the safety line runs through, this lip MUST be removed, ideally with a micro rat tail file, work the file in with gusto, and then wrap a bit of 800 grit paper around the file end to gloss off the inner hole surface, and then test the free running of the line through the tube, your new line joint must be pulled good and tight before hand, I use an anchor point to exert a hard constant pull and wet the joint in the line to get it thin and smooth, even working it a little with my teeth to get it to settle down nice and smooth with minimal bump in the line, this attention to detail around this joint point is critical, sloppy splicing or slap dash attention to detail is a sure way to get a big bump in the line join, and this will not work safely, so check and get it right before use on the water,
not a modification to try if your rubbish at splicing or not understanding exactly what I am trying to explain.
but get it right and you have the best click bar system ever made, with the best lines, and cheap to maintain!
-
Kitemenn
- Frequent Poster
- Posts: 428
- Joined: Mon Jun 18, 2018 9:21 am
- Local Beach: Maasvlakte / Slufter
- Gear: North Evo 11-7m / Lieuwe Shotgun
- Has thanked: 111 times
- Been thanked: 119 times
Re: Clickbar red safety line end cap removal
Sounds all good, I also replaced my upper front lines and backlines on my Clickbar the moment I bought it. Just don't understand what you are doing with the 86cm line, I guess you run it through the tubing but then what connectit to the lower front line or something? Or is the whole trick that 'normally' the red line is longer (this 86 cm) and you connect one of the equal lenght front lines to the 86cm line (which you can replace when necessary). Will the double splicing go through the tube? Thanks for this hack!Foil wrote: ↑Tue Aug 18, 2020 8:20 amits an easy conversion to get this feature, and it brings with it great advantages for future line maintenance,
and its way cheaper and easier, and you end up with better lines, Sk99, much less bulk on the bar, less wind drag due to much thinner lines, same strength lines but with longer life, smoother, more slippy and less likely to tangle as you run them out, no fraying around the ends of the line attachment points (where the common breaks happen)all this at half the price?? yes!!
basically you need to buy a full set of standard Ozone lines, choose the length you want, I go for the 23mtr, £125 gmb without discount for the set,
all lines are equal, the flag out line with red trace has the same red bar stop ball in the same place as the click bar, good stuff!
line ends are spot on for a quick swap over, no work to do on the 4 ozone lines.
"ALL" you have to do is make your own (or buy from a custom shop) a length of SK99 500kg line exactly 86cm long, and if you are splicing some spare SK99 lines to make up spares of this sacrificial line with a 15cm bury then remember to add in 20mm at each splice point for the lost length due to the splice bury,
There is good reason to buy the ozone lines in the maximum length available, if your good at splicing, as you can cut them down and use the extra line cuts for the sacrificial lines.
one great by product is you can make or buy many of these 500kg SK99 lengths and use them to renew the line area that gets worn where the lines cross when bar spinning/and kite looping.I am making plenty of these ready for my 6 month beach holiday.
please note!
if you decide to do the conversion then be aware of two points.
1
if you have to use a high Y split (most kites will fly great on no Y split above the depower, try it as some fly better) but if you do need a split point then just use a short length of electrical shrink wrap, 1.5mm internal diameter, use the click bar plastic green feed line to pull the main line through this heat shrink tube, it should be a snug fit, but once in place you can slide it to any chosen place along the line, just mark the point of choice with a black marker, then clamp on top of the sleeve the normal line splitter gismo, fully adjustable trick mod, but don't use heat to shrink the sleeve, you may damage the line, and its not required either if you use the right diameter heat shrink sleeve.
2
the top end of the black plastic power tube line has a small internal moulding lip hidden just inside the tapered top hole where the safety line runs through, this lip MUST be removed, ideally with a micro rat tail file, work the file in with gusto, and then wrap a bit of 800 grit paper around the file end to gloss off the inner hole surface, and then test the free running of the line through the tube, your new line joint must be pulled good and tight before hand, I use an anchor point to exert a hard constant pull and wet the joint in the line to get it thin and smooth, even working it a little with my teeth to get it to settle down nice and smooth with minimal bump in the line, this attention to detail around this joint point is critical, sloppy splicing or slap dash attention to detail is a sure way to get a big bump in the line join, and this will not work safely, so check and get it right before use on the water,
not a modification to try if your rubbish at splicing or not understanding exactly what I am trying to explain.
but get it right and you have the best click bar system ever made, with the best lines, and cheap to maintain!
-
Foil
- Very Frequent Poster
- Posts: 1447
- Joined: Mon Oct 23, 2017 7:44 pm
- Kiting since: 2000
- Weight: 91kg
- Local Beach: New Brighton near Liverpool. Open sea with big low tide deep lagoon
and regular at Rhosneigr and Newbrough on Anglesey - Favorite Beaches: New Brighton, Rhosneigr, Fleetwood, Newbrough, Blackrock sands
lake Como (Italy) El Medano - Style: kite foiler since 2017 Ttip since 2000
- Gear: My rule to gear choice is "IF IT DONT BOOST ITS NO USE"
Groove Skates 110cm 2022 editions
kraken mast systems 103k and 93k.
Kraken fuse 703k
Duotone SLS Evo's -- 11mtr/9mtr/7mtr/6mtr/ 4mtr RRD.
Duotone 2022 click bars x2,my own custom made lines fitted,
(modified lines now available for the flite99 shod duotone bars)
Bar lines made up to any length in a choice of strengths, power lines, trim lines, pigtails, leader lines, bridal lines, elasticated lines, I make and fit them all, free fit and tune service,
quick turnaround,drop me a message, find me on messenger, Colin Moore. - Brand Affiliation: None
- Has thanked: 116 times
- Been thanked: 324 times
Re: Clickbar red safety line end cap removal
Sounds all good, I also replaced my upper front lines and backlines on my Clickbar the moment I bought it. Just don't understand what you are doing with the 86cm line, I guess you run it through the tubing but then what connectit to the lower front line or something? Or is the whole trick that 'normally' the red line is longer (this 86 cm) and you connect one of the equal lenght front lines to the 86cm line (which you can replace when necessary). Will the double splicing go through the tube? Thanks for this hack!
[/quote]
the double splice joint will slide through as long as you follow point 2 on my last post
point 2
the top end of the black plastic power tube line has a small internal moulding lip hidden just inside the tapered top hole where the safety line runs through, this lip MUST be removed, ideally with a micro rat tail file, work the file in with gusto, and then wrap a bit of 800 grit paper around the file end to gloss off the inner hole surface, and then test the free running of the line through the tube, your new line joint must be pulled good and tight before hand, I use an anchor point to exert a hard constant pull and wet the joint in the line to get it thin and smooth, even working it a little with my teeth to get it to settle down nice and smooth with minimal bump in the line, this attention to detail around this joint point is critical, sloppy splicing or slap dash attention to detail is a sure way to get a big bump in the line join, and this will not work safely, so check and get it right before use on the water,
not a modification to try if your rubbish at splicing or not understanding exactly what I am trying to explain.
but get it right and you have the best click bar system ever made, with the best lines, and cheap to maintain!
- Rating: 6.06%
-
Kitemenn
- Frequent Poster
- Posts: 428
- Joined: Mon Jun 18, 2018 9:21 am
- Local Beach: Maasvlakte / Slufter
- Gear: North Evo 11-7m / Lieuwe Shotgun
- Has thanked: 111 times
- Been thanked: 119 times
Re: Clickbar red safety line end cap removal
Makes full sense...stupid Duotone didnt think of that! (or they did and just dont want to sacrifice loss off the larger front lines)
-
Foil
- Very Frequent Poster
- Posts: 1447
- Joined: Mon Oct 23, 2017 7:44 pm
- Kiting since: 2000
- Weight: 91kg
- Local Beach: New Brighton near Liverpool. Open sea with big low tide deep lagoon
and regular at Rhosneigr and Newbrough on Anglesey - Favorite Beaches: New Brighton, Rhosneigr, Fleetwood, Newbrough, Blackrock sands
lake Como (Italy) El Medano - Style: kite foiler since 2017 Ttip since 2000
- Gear: My rule to gear choice is "IF IT DONT BOOST ITS NO USE"
Groove Skates 110cm 2022 editions
kraken mast systems 103k and 93k.
Kraken fuse 703k
Duotone SLS Evo's -- 11mtr/9mtr/7mtr/6mtr/ 4mtr RRD.
Duotone 2022 click bars x2,my own custom made lines fitted,
(modified lines now available for the flite99 shod duotone bars)
Bar lines made up to any length in a choice of strengths, power lines, trim lines, pigtails, leader lines, bridal lines, elasticated lines, I make and fit them all, free fit and tune service,
quick turnaround,drop me a message, find me on messenger, Colin Moore. - Brand Affiliation: None
- Has thanked: 116 times
- Been thanked: 324 times
Re: Clickbar red safety line end cap removal
the big most noticeable difference is the reduction in bulk of thick hairy line on your click bar over stretching your restraining bungie's,
someone post a pic of your standard clickbar with 23/24mtr standard lines wrapped on in place possibly on scales and I will do the same with my "new improved" version, so we can see the difference, I will post mine up within the hour
Who is online
Users browsing this forum: bragnouff, Brent NKB, danilosanied, Faxie, Google [Bot], Greenturtle, i_love_storm, Kees, Kitechook, peppedurso, purdyd, thewindego, Vivo3d and 638 guests